DASR User Guide
Useful Documentations:
Questions? Comments? Contact Us here
Account and experiment set-up:
New users can register for a new account on DASR by clicking on the "New User? Register here" link on the DASR login page. Here, the user will be asked to enter a username, password and a valid email. Once the user has been approved by the administrator, a confirmation email will be sent out with a link to DASR where the user can now enjoy full access to the database.
One of the unique features of DASR is that it allows the user to set up a personalized "Experiment" sessions that can be populated with bed files of choice. To do so, click on the Create Experiment button and provide the experiment name etc.
Back to top
Upload bed files:
Uploading user-supplied bed files: The upload button  enables bed file to be uploaded to the database by browsing or by simply dragging the file to be uploaded to the screen. The file size cutoff is 500MB, where files smaller than 500MB are stored in the database that allows it to be queried, and files larger than 500MB are saved in a non-queriable format. Once the bed file is uploaded, the file will be visible on the main dashboard.
Uploading bed files from the "Reference files library": As the name implies, the reference file library is a library containing standard, frequently-referred-to bed files. The reference files are managed by the administrator; therefore, regular users do not have access to make changes to these files. The user can, however, upload the reference files to his or her personal Experiment session for analysis. This can be done by clicking on reference file pull-down menu located at the bottom of the experiment page, and selecting the reference file to be uploaded.
Back to top
Delete bed files:
Bed files can be delected. Please note that deletion is permanent and irreversible. To delete bed fiels, select the checkbox next to the bed file to be deleted and click on the delete button  . The delected file will appear as a strickthrough format. To remove the bed file from view, simply reload the page.
Back to top
Annotate bed files:
The edit functions allows user to assign descriptors to bed files. To do so, check the checkbox(es) next to the bed file(s) to be annotated and click on the "edit" button  . The fields: "name", "genome", "method", "header" and "description" will become text fields that accept user inputs. Modify the fields as needed and when done, click on the "done editing button" and the new descriptors will be saved to the database.
Back to top
Administrator priviledges:
The administrator has privilegde to upload, delete, annotate reference bed files. This privilege is not availabel to regular uses -- to whom the reference files are immutable. To become an administrator of the database, please contact the DASR developers for your account to be approved.
Back to top
View and search bed files:
The administrator has priviledge to view and search experiments and bed files generated by all users. On the main index page of the administrator, all experiments are displayed. Each experiment is hyperlinked to the experiment page containing individual bed files. To view all the bed files contained in the database, click on the "view all bed file" link which will take the administrator to a page where all the bed files are listed. Here, the administrator has access to make modification or delete the bed files listed. The bed files are also searcheable by the bed file name.
Back to top
Visualize bed files on the UCSC Genome Browser:
The DASR database is linked to the UCSC browser, allowing users to visualize the bed files stored in the database on the UCSC genome browser directly. To do so, first select the bed file(s) to be visualized by checking the checkbox, then click on the UCSC browser link  . The bed file will be uploaded to the UCSC browser automatically. If error occurs, please check for common errors in the bed file format, eg. chromosome start larger than end; chromosome end larger than the chromosome length.
Back to top
Compare bed files:
DASR integrates the BEDTOOLS package to search for overlaps between two bed files. To perform the DASR Compare function, exactly two bed files must be selected. Once two bed files have been specified by clicking on the checkboxes, click on the Compare button  . A pop-up window will appear prompting for the number of base pair overlap. The DASR compare function generates two output files: 1) Side_by_side_comparison output: this is the raw output generated from the Bedtools where the last column indicates the number of base pair overlap (see BedTools manual) 2) Regions_of_overlap output: this output only shows the regions that are overlapping in the two input bed files being compared. This output is compatible with UCSC browser and can be downloaded for visualizations. Upon the completion of the comparison, the output files will be automatically uploaded to the dashboard, where additional functionalities can be applied. In addition to file outputs, statistical details of the overlap are displayed in graphs. These graphs can be accessed by clicking on the hyperlinked file names of the output. Figure 1 of the graph output shows the number of reads overlap while figure 2 shows the overlap per reads by chromosome.
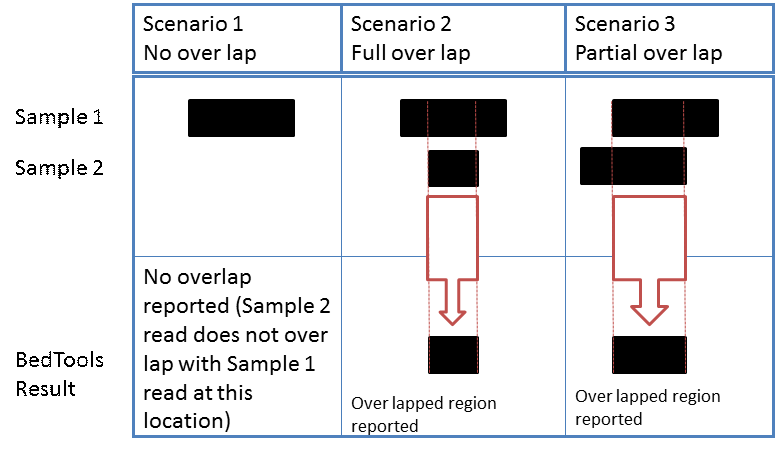
It should be noted that the BedTools comparison reports only the specific over lapping regions between samples. For cases where there may be full or partial overlap between sequence reads, only the regions of overlap are reported in the BedTools result. As depicted in the figure below; scenario 1 results in no overlap, scenario 2 reports the over lapping region for full overlap, and scenario 3 reports the over lapping region for partial overlap.
Back to top
Extracting bed files:
Bed files can be queried and extracted using the Extract function. Select the bed files to be extracted, and click on the Extract button  . A pop-up window will appear where the user can input the regions to be extracted (chromosome, start and end). The user also has the option of extracting the bed file based on RGB value. The extracted file is automatically uploaded to the dashboard and stored in the database.
Back to top
Splitting bed files:
An extension of the Extract function is the is splitting large bed files according to chromosomes. For example, for a bed file that contains reads from chromosome 1 to 20, the Extract function can be repeatedly utilized to separate the file into 20 individual files for each chromosome.
Back to top
Downloading bed files:
All bed files displayed on the dashboard are available for download. Select the bed file to be downloaded and click on the download button  . A number of file extentions: csv, xls, txt or custom specified file extenstion are available.
Back to top
Count bed files:
The count function provides statistical information on each bed file, specifically, it counts the number of individual reads in each bed file by chromosome and display the counts as values and pie chart. To access the count feature, click on the hyperlinked bed file names on the dashboard.
Back to top
Preview bed files:
Bed files can be viewed directly on the browser without having to download them. To preview bed files, simply click on the hyperlinked bed file names on the dashboard.
Back to top